
See that SDA/SCL (yellow/orange) are connected to pin 1, 2. VCC is at 5V
Sensor connections: Red: VCC, Black: GND, yellow/orange: SDA/SCL
Date: 13.05.2022
In the esp32 post I describe how to get a controller working with Rust. Obviously, you don’t just get a controller working, but usually want to do something with it. In my case, the final goal is to implement a wind-midi controller.
Apart from registering pressed keys the most important part is the wind part. I decided to use the Renesas Fs 1027 DG gas flow sensor. I tried an air pressure sensor before. But I couldn’t get it to work properly. Also, just blowing against something is not as immersive as blowing through something.
At the time of writing, the sensor is priced at ~50€, which makes it a little costly for a hobby project. But it also provides a 12bit resolution as well as a perfect measuring range for my application.
Since we are implementing something using a sensor it makes sense to set up a small testing bed. In my case it consists of
The PHR-6 plug configuration can be found in the sensor’s data sheet.
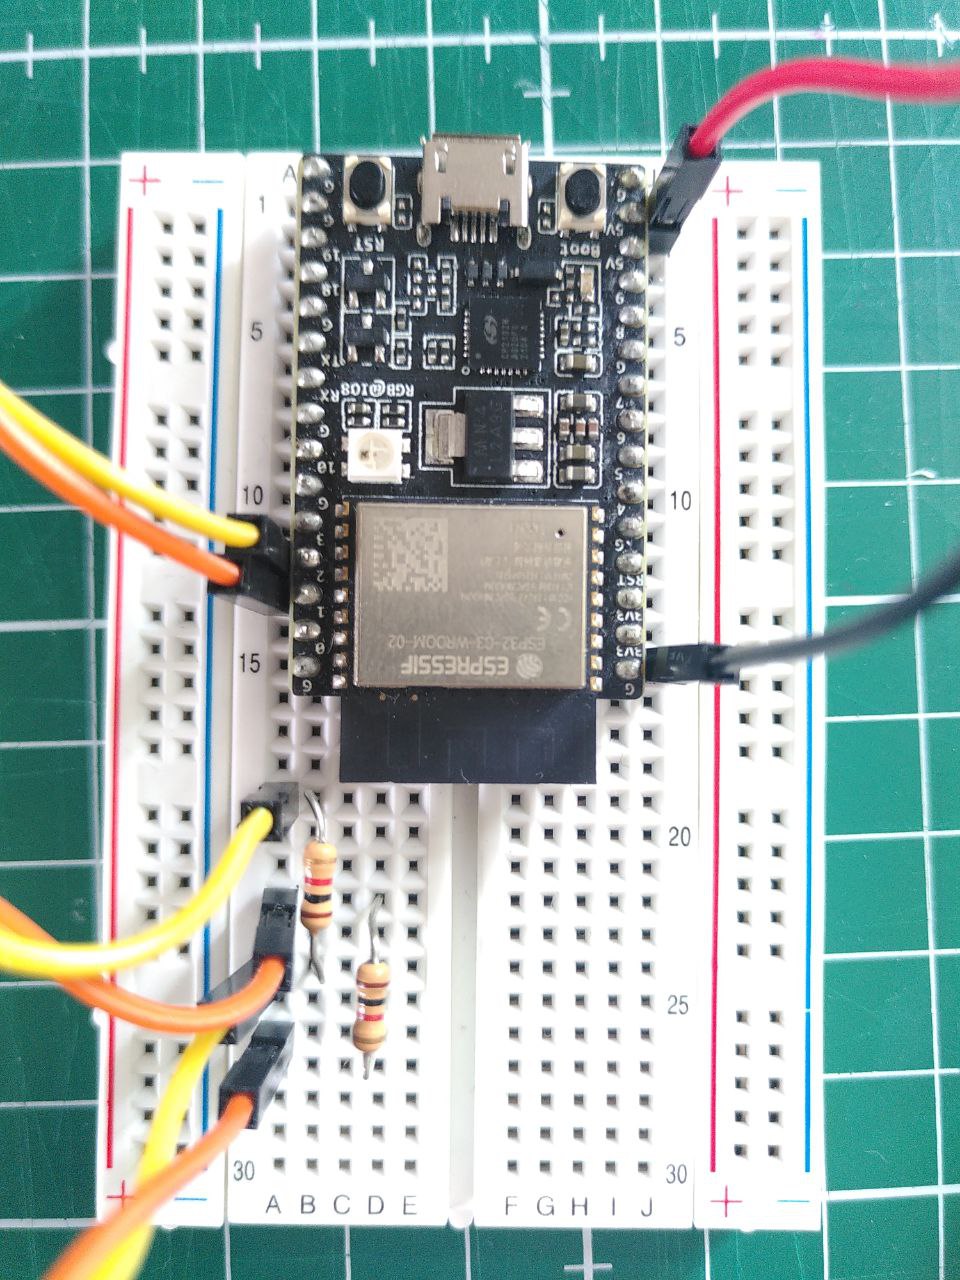
The whole setup looks like this:
See that SDA/SCL (yellow/orange) are connected to pin 1, 2. VCC is at 5V
Sensor connections: Red: VCC, Black: GND, yellow/orange: SDA/SCL
Note that you have to use 5V as VCC. I tried 3.3V, but I only got MAX readings. Both for the I²C data and on the analog line.
The driver itself uses embedded-hal to integrate into the Rust embedded world. It is also our only dependency.
Luckily, the sensor has an I²C sensor, so hooking up the sensor to
anything is as easy as knowing its address on the I²C Bus. Since I like
having the choice of using the defaults (in this case the default
address is 0x50) or specifying it. I decided to provide two
initializer functions: new and
new_default.
Reading data is easier than I thought. At first, I tried to implement the protocol specified in the data sheet (sending, high and low to for start the start condition etc.). But after more research I found out that this is the standard I²C protocol on the data level, so reading data is as easy as:
self.i2c.read(addr, &mut data_buffer).unwrap();So we only have to take care of two things: 1. providing the
data_buffer 2. Handling read errors
Some driver implementations let the user provide the
data_buffer. For instance, smoltcp does not allocate
anything when in no_std mode. In my case however, the
buffer is always 5 * size_of::<u8>() wide, so I
decided to make it part of the Fs1027Dg struct.
Data error can occur at two points while reading. On the physical level (no bits received), and on the data level (wrong bits received/ didn’t pass validation).
To provide a nice API I decided to let try_read
return an Option<u16>. If the user doesn’t care,
there are the wrapper functions read and
read_flow_rate that always return. In case of an error 0 is
returned.
Verifying data is specified in the data sheet as well. It works by
(wrapping) adding the two data bytes as well as two generic
checksum bytes. This sum is then added to the checksum byte and has to
result in 0x0.
In Rust this translates to these lines:
    let value = u16::from_be_bytes([self.read_buffer[1], self.read_buffer[2]]);
    let sum = self.read_buffer[1] //data byte 0
        .wrapping_add(self.read_buffer[2]) //data byte 1
        .wrapping_add(self.read_buffer[3]) //generic checksum 0
        .wrapping_add(self.read_buffer[4]);//generic checksum 1

    let is_valid = self.read_buffer[0].wrapping_add(sum) == 0;
The 12bit (encoded in u16) value is not yet really
usable. Luckily, the data sheet once again provides us with the
conversion function into l/min. I used it to provide the
read_flow_rate function.
At this point we wrapped (I think) all the functionality into a nice little struct with less than 100 LoC.
We now can do the following, assuming that the I²C pins are correct
    let i2c = I2C::new(
        peripherals.I2C0,
        io.pins.gpio1,
        io.pins.gpio2,
        100_000,
        &mut peripherals.SYSTEM,
    ).unwrap();

    let mut driver = fs1027_dg_hal::Fs1027Dg::new_default(i2c);

    //Yay this should be the current flow rate, or 0.0
let flow = driver.read_flow_rate();After documenting everything, releasing the crate is as easy as calling
$ cargo publishNow the crate can be found on crates.io and its documentation on docs.rs. The code is hosted on my gitlab. It includes an esp32-c3 based sample that reads data from the sensor and writes it to the serial connection. If you build the same hardware-setup as I did, it should work.